Pressure & Expansion
How to Install a Thermal Expansion Tank
Researched from the DOE test procedures, NFPA 54 and NEC code tables, and manufacturer specifications. Updated .
Quick answer
A thermal expansion tank is not a complicated part, but the install has two steps that are easy to skip and both quietly defeat the tank if skipped. The first is support: a tank full of water and pressurized air is heavy, and screwing it onto a small threaded tee and letting the pipe carry that weight is how the tee eventually cracks or the tank sags and leaks at the joint. The second, more common, is pre-charge: every tank ships from the factory with a fixed amount of air already in the bladder, and that number is a starting point, not the number to leave it at. If it does not match your home static supply pressure before the tank is plumbed in, the tank behaves as though it were not there.
This page walks through the order of operations: where the tank goes, how it is supported, how pre-charge is measured and set, and how to confirm afterward that it is doing its job. None of the steps require special tools beyond a tire gauge, a wrench, and a way to add or bleed air, but skipping the order matters as much as the parts list.
Where does an expansion tank go on the plumbing?
An expansion tank installs on the cold water inlet line supplying the water heater, not on the hot outlet side. It typically threads into a tee fitting cut into the cold line within a few feet of the tank, either before or after the shutoff valve depending on local practice, though placing it after the shutoff means the tank can be isolated without draining the whole cold supply. The tank can mount in almost any orientation the tee allows, hanging down, pointing up, or running horizontal off a wall-mounted tee, as long as the mounting is properly supported.
Do not install an expansion tank on the hot side. The tank absorbs water volume as it expands during heating, and that expansion happens on the cold inlet side of a closed system because the check valve, PRV, or backflow preventer that closes the system sits somewhere upstream on the cold supply. A tank on the hot outlet does not sit in the right part of the circuit to do that job.
Why does the tank need its own support bracket?
A 2 gallon expansion tank filled with water weighs several pounds beyond its own empty weight, and a 12 gallon tank weighs considerably more. Threading that weight onto a 3/4 inch tee fitting and calling the install finished is a common shortcut, and it is also the reason a surprising number of expansion tank failures are actually failures of the tee or the joint below it, not the tank itself. Vibration from water flow and the ordinary flexing of copper or PEX under thermal cycling both work on that joint over years.
A wall-mounted or joist-mounted bracket that cradles the tank body and carries its weight independent of the threaded connection removes that stress from the pipe entirely. The threaded connection then only has to seal, not support. This is a five-minute addition to an install and it is the difference between a tank that lasts the life of the water heater and one that eventually pulls its own fitting loose.
What is the pre-charge step and why does it matter more than anything else?
Every expansion tank ships with a factory air pre-charge in its bladder, commonly around 40 psi, set through a Schrader valve on the tank identical in appearance to a bicycle or car tire valve. That factory number is not calibrated to your home. Before the tank goes anywhere near the plumbing, that pre-charge has to be checked with an ordinary tire gauge and adjusted, using a hand pump or a small compressor, to match your home static water supply pressure.
Static supply pressure is the pressure in your home plumbing with no water running and no fixture open anywhere in the house, measured at a hose bibb with a simple gauge. If the tank pre-charge sits well below that number, incoming water pressure overcomes the air cushion inside the tank almost immediately once it is plumbed in, compressing the bladder to nearly its full travel with only a small rise in system pressure. The tank is now installed, full of water, and doing almost nothing, because it has no air cushion left to absorb the next cycle of thermal expansion. This is, by a wide margin, the step people skip, and it is also the step that makes the tank work or not.
Set pre-charge with the tank empty of water and disconnected from the system. Check it again any time static supply pressure changes, such as after a plumber installs or adjusts a pressure-reducing valve.
How do I measure static supply pressure before setting pre-charge?
| Static pressure at hose bibb | What it means | Pre-charge target |
|---|---|---|
| 40 to 60 psi | Typical municipal residential range | Set tank pre-charge to the measured value |
| 60 to 80 psi | High but common in some municipal systems | Set tank pre-charge to the measured value; consider a PRV |
| Above 80 psi | Above the range most fixtures and appliances are rated for | A pressure-reducing valve is the fix, not a bigger expansion tank |
Published standard Source: Measured directly with a hose bibb pressure gauge; ranges reflect common municipal supply pressure and typical fixture pressure ratings.. Measure with every fixture in the house closed and no water running. A reading taken while a fixture is open reads low and understates static pressure.
How do I know the tank is actually working after installation?
After the tank is plumbed in with pre-charge correctly set, the simplest field check is to tap the tank body on the air side, above the internal diaphragm, and on the water side, below it. The air side should sound hollow, and the water side should sound solid or dull, a rough but useful confirmation the diaphragm holds a separate air charge rather than being fully waterlogged. A tank that sounds hollow all the way down was never properly pre-charged, has lost its charge through the Schrader valve, or has a ruptured bladder.
The functional test that matters most is whether the T&P valve stops dripping, if that was the original symptom. If the relief valve keeps weeping after the tank is installed, recheck the pre-charge first, since an incorrect pre-charge is the most common reason a correctly sized tank does not stop the drip. If pre-charge is confirmed correct and the valve still drips, static supply pressure itself may already be too high for an expansion tank alone to manage, which points toward a pressure-reducing valve instead.
Can I skip the expansion tank if the relief valve seems fine?
No. If your water supply has a check valve, a pressure-reducing valve, or a backflow preventer anywhere upstream, meaning the system is closed, an expansion tank is doing structural work even when nothing is visibly dripping. A T&P valve that has not yet opened on a closed system without an expansion tank is not evidence the system is fine, it is evidence the valve has not yet been pushed past its opening pressure by enough thermal cycles. Never treat the absence of a drip as permission to skip the tank, and never respond to a dripping valve by capping, plugging, or removing it. A dripping T&P valve is doing its job as a pressure vessel safety device; the fix is to address what is pushing pressure that high, not to silence the valve.
Expansion tanks and the fittings that support them
Size the tank to your water heater volume and static pressure with the expansion tank size calculator before buying. A tee fitting and a wall or joist bracket belong on the same order as the tank itself.

Amtrol ST-5 2 Gallon
$77.99A potable-rated tank sized for a standard 40 to 50 gallon household heater, the size most residential installs land on.
Best for: Anyone who wants the name plumbers recognise
Check price on Amazon
Eastman 2 Gallon Thermal Expansion Tank
$34.98A lower-cost 2 gallon potable tank for the same standard tank size, a reasonable choice for a rental or a first replacement.
Best for: The standard 40 or 50 gallon tank on a closed system
Check price on Amazon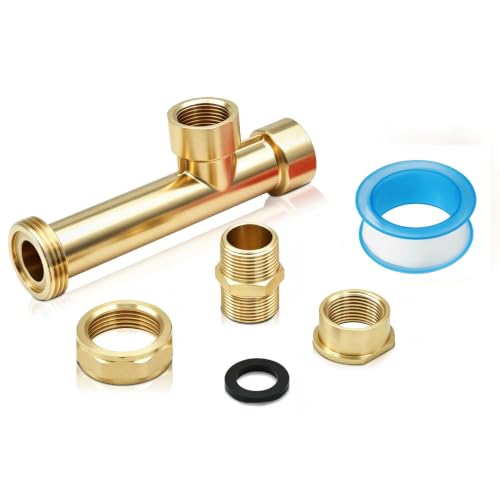
Brass Water Heater Expansion Tee, 3/4 in NPT
$31.59A threaded tee built specifically to accept an expansion tank on the cold inlet without cutting in a separate fitting from scratch.
Best for: Adding an expansion tank to an existing install
Check price on Amazon
Expansion Tank Wall Mounting Bracket
$15.99A bracket that carries the tank weight off the tee and onto a joist or wall stud, the support step most installs skip.
Best for: Every expansion tank installation
Check price on AmazonFrequently asked questions
- Where does an expansion tank install on a water heater?
- An expansion tank installs on the cold water inlet line near the water heater, typically threaded into a tee fitting cut into the cold supply pipe, never on the hot outlet side. It can hang, sit upright, or mount horizontally depending on the tee orientation, provided a bracket carries its weight rather than the threaded connection alone.
- What pre-charge should I set an expansion tank to?
- Set the tank pre-charge, using a tire gauge and a hand pump or small compressor at the Schrader valve, to match your home static supply pressure measured at a hose bibb with no fixtures running. Factory pre-charge, commonly around 40 psi, is a starting point only and rarely matches an individual home.
- Does an expansion tank need a support bracket?
- Yes. A water-filled expansion tank is heavy enough that resting its full weight on a threaded tee fitting stresses that joint over years of vibration and thermal cycling. A wall or joist bracket that cradles the tank body removes that load from the threaded connection, which then only has to seal.
- Why is my new expansion tank not stopping the T&P valve from dripping?
- The most common cause is a pre-charge that was never checked or set to match static supply pressure before installation. Recheck it with a tire gauge; if pre-charge is confirmed correct and the valve still drips, static supply pressure itself may be high enough that a pressure-reducing valve is the actual fix.
- Can I install an expansion tank on the hot water side instead?
- No. An expansion tank belongs on the cold inlet line, upstream of the water heater, in the same part of the circuit as the check valve or pressure-reducing valve that closes the system. Installing it on the hot outlet does not place it correctly to absorb expansion as the tank heats.
- How often should I recheck expansion tank pre-charge after installation?
- Recheck pre-charge any time static supply pressure changes, such as after a municipal utility work or a plumber adjusting a pressure-reducing valve, and as a routine check if a T&P valve starts dripping again after a period of working correctly. There is no fixed interval published by manufacturers beyond checking when symptoms appear.
Support the tank on a bracket, and set the pre-charge to static supply pressure before it goes anywhere near the plumbing. Those two steps, in that order, are what separate an expansion tank that protects the T&P valve from one that only looks installed.